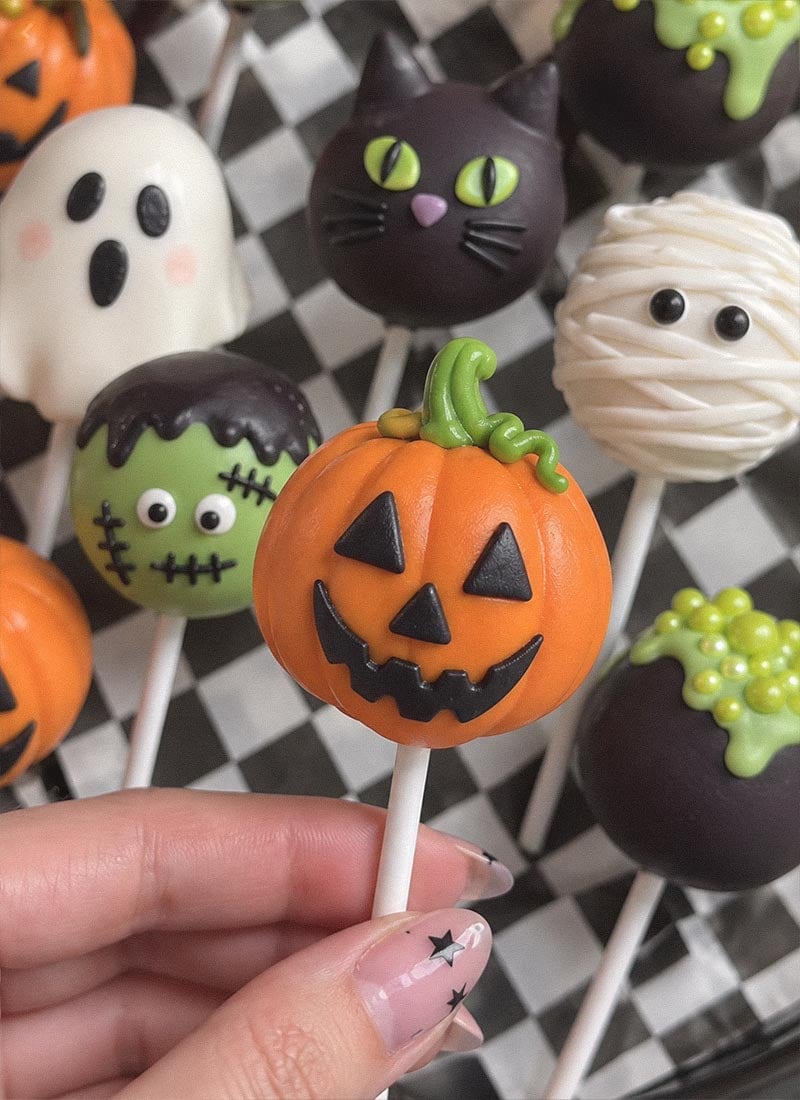
Halloween cake pops are bite-sized treats made with crumbled cake, frosting, and a candy coating, all served on a stick. They’re super easy to make, even for beginners, and most of the ingredients are easy to find at your local grocery store. You may even have some of them waiting in your pantry already.
One of my favorite things about Halloween cake pops is how customizable they are. With a few simple decorations, you can transform them into spooky mummies, friendly ghosts, pumpkins, monsters, bats, and just about any Halloween character you can imagine.
If you’re ready to make your own, browse these Halloween cake pop ideas for decorating inspiration, plus tips for achieving smooth, glossy candy melts every time.
What You Need for Halloween Cake Pops
You only need a few basic ingredients for the cake pops themselves, plus candy melts and decorations to bring your spooky designs to life. Feel free to use your favorite cake flavor and frosting since almost any combination works well.
- Baked cake – You can use a homemade cake or a boxed cake mix. Vanilla and chocolate are classic choices, but red velvet, funfetti, or your favorite flavor work just as well.
- Frosting – Helps bind the crumbled cake together, allowing you to roll it into smooth, sturdy balls. Store-bought frosting works perfectly, though homemade is a great option too.
- Candy melts – These create the smooth outer coating and come in plenty of Halloween-friendly colors like white, orange, black, dark brown, purple, and green. They’re easier to work with than regular chocolate and set quickly.
- Lollipop sticks – They turn cake balls into cake pops, making them easy to dip, decorate, and serve. Standard 4- to 6-inch paper sticks are the most common choice.
Depending on the Halloween character you’re making, you may also want to have these on hand:
- Candy eyes – They come in different sizes, the easiest way to turn plain cake pops into ghosts, monsters, mummies, and other spooky creatures.
- Sprinkles – Add color, texture, and a festive finish with Halloween-themed sprinkles in fun shapes and colors.
- Black decorating icing – Perfect for drawing faces, spider webs, mummy bandages, or other small details after the coating has set.
- Colored sanding sugar – A light coating of sanding sugar adds sparkle and a little extra texture to pumpkins, monsters, or witches.
- Crushed cookies – Crushed chocolate cookies create a dirt-like effect or add crunchy texture to themed designs.
- Edible glitter – A little edible glitter gives your Halloween cake pops a magical shimmer.
- Mini chocolate chips – These make great eyes, ears, or tiny decorative accents for bats, pumpkins, and other characters.
- Pretzel pieces – Broken pretzels are perfect for making antlers, stems, spider legs, or other creative decorations.
- Fondant – Use fondant to shape small features like ears, hats, bows, or pumpkins for more detailed cake pop designs.
Halloween Cake Pops Recipe Ideas
1. Bubbling Cauldron Cake Pops Full of Halloween Magic
Bring a little witchy magic to your Halloween spread with these bubbling cauldron cake pops. A coating of black candy melts creates the cauldron, while a generous swirl of blue frosting on top becomes the potion overflowing with candy eyeballs and festive sprinkles. Using a piping bag makes the bubbly topping easier to shape, and letting the black coating set completely before decorating helps every colorful detail stay crisp. Arrange them upright in a cake pop stand so the whimsical potion tops remain picture-perfect until it’s time to serve.
Related: 15+ Halloween Games for Adults That Everyone Will Want to Play
2. Friendly Ghost Cake Pops for a Sweet Halloween Treat
These ghost cake pops prove you don’t need fancy molds to create an adorable Halloween treat. Each one is shaped by hand by rolling the cake mixture into a ball, gently flattening it, and pinching the bottom into soft waves for that classic floating ghost look. Candy corn pieces are attached as little arms before the entire pop is coated in white candy melts, then finished with candy eyes, icing gel for other facial details, and an orange M&M that looks like the ghost is carrying a trick-or-treat bag. Chilling the shaped cake pops before dipping helps every detail stay intact, and a toothpick comes in handy for positioning the tiny decorations neatly.
3. Mini Pumpkin Cake Pops that Look Fresh from the Patch
These adorable Halloween cake pops look like tiny pumpkins straight from the patch. The secret is carving deep grooves into each cake ball before chilling, which creates ridges that still show after the orange candy coating goes on. A fondant modeling tool or the back of a butter knife works well for shaping the lines, while a chocolate chip on top completes the look. Stand the finished cake pops upright as they set so the coating stays smooth and every pumpkin keeps its perfectly rounded shape.
4. Classic Mummy Cake Pops for a Spooky Dessert Table
You only need a few basic decorations to turn ordinary cake pops into these adorable little mummies. After coating each pop in white candy melts, drizzle melted chocolate back and forth to create the wrapped bandage effect, then add a pair of candy eyes before everything sets. A squeeze bottle or piping bag with a tiny opening gives you neat, even lines without much effort. The slightly uneven drizzle actually makes these mummy cake pops look more realistic, so there’s no need to aim for perfection.
5. Out-of-This-World Alien Cake Pops for Halloween
Bright green candy melts instantly give these alien cake pops an out-of-this-world look, while candy eyes and piped chocolate mouths turn every one into its own quirky little character. Mix two, three, and even four eyes for a fun assortment instead of making every alien identical, and use a toothpick to nudge the eyes into place before the coating sets. Displaying them on a black serving tray makes the vibrant green color stand out even more, creating a playful centerpiece for your Halloween dessert spread.
6. Spooky Eyeball Cake Pops that Guests Won’t Forget
If you’re looking for a Halloween dessert with a little shock factor, these eyeball cake pops deliver. A smooth white candy coating becomes the perfect canvas for edible iris decorations, while red icing drips create a convincingly creepy bloodshot effect. Instead of traditional sticks, each cake pop is served with a small plastic fork, making them look as though they’ve been plucked right off a mad scientist’s table. Let the white coating harden before adding the colored details so every eye stays crisp and realistic.
7. Cute Bat Cake Pops with Oreo Cookie Wings
These bat cake pops stand out thanks to their mini Oreo cookie wings, which add both texture and a rich chocolate crunch alongside the soft cake center. Press the Oreo halves into each cake ball before dipping so they’re firmly secured, then coat everything in black candy melts. A dusting of edible black glitter gives the coating extra sparkle, while candy eyes and piped frosting details bring each little bat to life with playful expressions. If you’re making a large batch, decorate in stages so the candy coating doesn’t harden before you finish adding the facial features.
Related: 25+ Halloween Cupcakes With Spooky Decorating Ideas for Your Party
8. Disney-Inspired Poison Apple Cake Pops for Halloween
With their glossy red coating and eerie green drips, these poison apple cake pops look like they came straight from a wicked fairy tale. Once the red candy melts have completely set, drizzle green candy melts over the top using a piping bag to create thick, uneven drips that mimic bubbling poison. Let a few drips run farther than the others for a more dramatic effect, and rotate each cake pop as you decorate so the design wraps naturally around the entire apple. They’re simple to make but guaranteed to become one of the most eye-catching treats on your Halloween dessert table.
9. Zombie Cake Pops with Creepy Walnut Brains
These zombie cake pops get their creepy charm from a surprisingly simple decorating trick. After coating the cake pop in green candy melts, a walnut half is attached to the top and then dipped into red candy melts to create an exposed brain without any intricate piping. Candy eyes, black icing, and a few red “blood” drips bring each zombie face to life, and since no two expressions have to match, you can have fun making every one look a little different. Keep a pair of food-safe tweezers nearby for placing the small decorations while the coating is still tacky, making the whole decorating process much easier.
10. Harvest-Inspired Scarecrow Cake Pops for Halloween
These scarecrow cake pops bring together Halloween and harvest season in one adorable treat. Yellow shredded coconut creates realistic straw hair, while an edible marker makes it easy to draw stitched smiles, rosy cheeks, and playful facial features before adding black sprinkle eyes and a candy corn nose. The standout detail is the miniature hat, made from an upside-down peanut butter cup set on an Oreo cookie with a candy corn tucked into the band for a festive pop of color. Assemble the hats separately before attaching them with a little melted chocolate to keep everything neat, and you’ll have charming scarecrow cake pops that look ready for a stroll through the pumpkin patch.
Related: 21 Easy Last-Minute Halloween Costumes Using Clothes You Already Own
How to Get Smooth Candy Melts for Halloween Cake Pops
A smooth candy coating gives your Halloween cake pops that polished, bakery-style finish. If your candy melts are too thick, lumpy, or start hardening before you’re done dipping, these tips will help.
Keep everything dry.
Even a tiny amount of water can cause candy melts to seize and become grainy. Make sure your bowl, spoon, and spatula are completely dry before you begin, and avoid getting steam or water into the melted candy.
Melt slowly.
Whether you’re using a microwave or double boiler, gentle heat is key. If using a microwave, heat the candy in short intervals, stirring between each one until smooth. Overheating is one of the most common reasons candy melts become thick or difficult to work with.
Thin the candy melts if needed.
If the melted candy feels too thick for dipping, stir in a small amount of coconut oil or solid vegetable shortening until it reaches a smoother consistency. Avoid adding water, milk, butter, or liquid oils, as they can cause the coating to seize or prevent it from setting properly.
Keep the candy warm.
Candy melts naturally thicken as they cool. If you’re decorating a large batch, keep the bowl warm by using a candy melting pot or gently reheating the candy as needed.
Use a deep, narrow bowl.
A deeper bowl makes dipping much easier because you can fully submerge each cake pop without having to tilt or scoop the candy coating. This also helps create a smoother, more even finish.
Let excess coating drip off.
After dipping, gently rotate the cake pop and lightly tap your wrist to let the excess coating drip back into the bowl. This helps prevent thick coatings, large drips, and uneven bottoms. Experienced cake pop makers also recommend avoiding tapping the stick directly, which can loosen the cake ball.
Work with chilled, not frozen, cake pops.
Cake pops should be firm enough to hold their shape, but they shouldn’t be frozen solid. An extreme temperature difference between very cold cake pops and hot candy melts can sometimes cause the coating to crack as it sets.
Final Thoughts
Whether you’re planning a Halloween party, putting together classroom treats, or making edible gifts for friends and neighbors, Halloween cake pops are always a crowd-pleaser. Many of these designs are surprisingly simple to recreate, and you can easily customize them with your favorite colors, candies, and sprinkles. Happy decorating, and have a fun and delicious Halloween!